extends SpringBootServletInitializer| CRUD(DB) | HttpMethod | URL |
| SELECTALL | GET | Http://localhost:8080/members |
| SELECTONE | GET | Http://localhost:8080/members/jimin |
| INSERT | POST | Http://localhost:8080/members |
| UPDATE | PUT | Http://localhost:8080/members/jimin |
| DELETE | DELETE | Http://localhost:8080/members/jimin |
브라우저에서는 PUT과 DELETE를 사용하지 못하기 때문에 PostMan을 이용하여 테스트를 할 수 있다.
GET방식과 Post방식,Put, DELETE가 같은 URL이 같더라도 httpmethod에 따라 실제로 작동해야될 CRUD가 달라진다.
text같은 것들도 물론 사용이 가능하지만 검색, 삭제, 치환이 가능하기때문에 xml을 사용한다.
하지만 parsing이 어렵다는 이유로 json형식으로 데이터를 오고가게하는 방법을 선호하기 시작했다. Restfulapi(RestFul 스펙에 의해서 만들어진 Api)를 json형태로 데이터를 보내고 받을 예정이다.
Jar로 페키징되어있다면 RestFulApi를 사용하지 못하기 때문에 War로 리패키징하여 Tomcat에 올려 Restcontroll로 바꾼다.
War를 이용하여 프로젝트 만들기
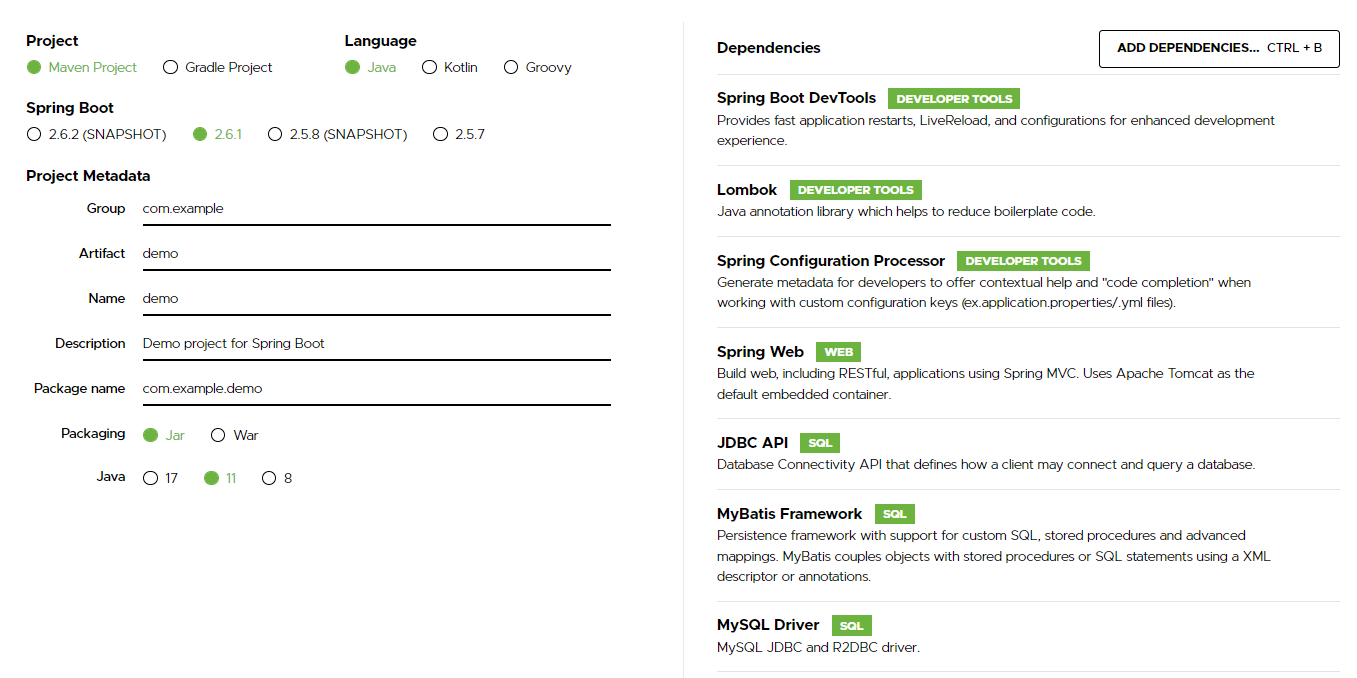
Sts를 이용하여 프로젝를 만들어도 되지만 dependency가 안되는 것들(특히 lombok때문)도 있기때문에 Spring Initailizr를 이용하여 만들도록 하였다.
| Dependency | 설명 |
| SpringBootDevTools | 저장시 자동으로 서버를 재시작해줌 |
| Lombok | setter,getter등 여러가지 Annotaion을 사용할 수 있게해줌 |
| SpringConfiguration Processor | ApplicationProperties외에 추가 환경을 할 경우 연결해줌 |
| SpringWeb | Web을 사용시 필요(RestFul) |
| JDBC Api | Mybatis를 사용하더라고 DB를 사용하려면 필요함 |
| MyBatis FrameWork | Mybatis사용시 필요 |
| MySql Driver | DB사용시에 필요 |
Log4jdbc를 사용하기 위한 Dependency 추가
<dependency>
	<groupId>org.bgee.log4jdbc-log4j2</groupId>
	<artifactId>log4jdbc-log4j2-jdbc4.1</artifactId>
	<version>1.16</version>
</dependency>
logBack.xml 생성
<?xml version="1.0" encoding="UTF-8"?>
<!DOCTYPE configuration>
<configuration>
<include resource="org/springframework/boot/logging/logback/base.xml" />
<logger name="jdbc.splonly" level="DEBUG" />
<logger name="jdbc.sqltiming" level="DEBUG" />
<logger name="jdbc.audit" level="DEBUG" />
<logger name="jdbc.resultset" level="DEBUG" />
<logger name="jdbc.resultsettable" level="DEBUG" />
<logger name="jdbc.connection" level="DEBUG" />
</configuration>DEBUG로 level을 낮추어 어떤 순서로 실행되는지 알 수 있다
log4jdbc.log4j2파일 생성
log4jdbc.spylogdelegator.name=net.sf.log4jdbc.log.slf4j.Slf4jSpyLogDelegator

#Disable - Loading class `com.mysql.jdbc.Driver'. This is deprecated. The new driver class is `com.mysql.cj.jdbc.Driver'.
#The driver is automatically registered via the SPI and manual loading of the driver class is generally unnecessary.
# log4jdbc의 드라이브 클래스 설정
log4jdbc.drivers=com.mysql.cj.jdbc.Driver
log4jdbc.auto.load.popular.drivers=falsespy가 자꾸 예전 드라이버를 찾기때문에 CJ이가 붙은 드라이버를 따로 명시해준다.
db에서 데이터가 넘어오는 순서
RDBMS -> JDBC Driver -> Data Source(hikari) -> jdbc interface(mybatis) -> Dao -> service -> controller
ERD생성

체크제약조건

| 체크제약조건 | |
| CK_Member_gender | gender IN('1','0') |
| CK_Member_city | city IN('서울','부산','대구','광주,'대전','안천') |
| CK_Member_age | age BETWEEN 1 AND 60 |
모델 영역에서 스키마 이름을 내가 사용할 DB이름으로 바꾸고 포워드 엔지니어링을 진행한다.
DBConnection Explorer에 가서 new를 누르고 MysqlConnecttor.jar를 이용하여 사용가능하도록 한다.
DataBaseConfig생성
@Configuration
@PropertySource("classpath:/application.properties")
@Slf4j
public class DatabaseConfiguration {
	@Autowired
	private ApplicationContext applicationContext;

	@Bean
	@ConfigurationProperties(prefix = "spring.datasource.hikari")
	public HikariConfig hikariConfig() {
		return new HikariConfig();
	}

	@Bean
	public DataSource dataSource() throws Exception {
		DataSource dataSource = new HikariDataSource(hikariConfig());
		log.info("datasource : {}", dataSource);
		return dataSource;
	}

	@Bean
	public SqlSessionFactory sqlSessionFactory(DataSource dataSource) throws Exception{
		SqlSessionFactoryBean sqlSessionFactory = new SqlSessionFactoryBean();
		sqlSessionFactory.setDataSource(dataSource);
		Resource configLocation = new PathMatchingResourcePatternResolver().getResource("classpath:/mapper/mybatis-config.xml");
		sqlSessionFactory.setMapperLocations(applicationContext.getResources("classpath:/mapper/mybatis-mapper.xml"));
		sqlSessionFactory.setConfigLocation(configLocation);
		return sqlSessionFactory.getObject();
	}

	@Bean
	public SqlSessionTemplate sqlSessioinTemplate(SqlSessionFactory sqlSessionFactory) {
		return new SqlSessionTemplate(sqlSessionFactory);
	}
}DataSource를 연결하기위한 환경설정 Class를 생성한다.
DemoApplocation.java에서 설정바꾸기
@SpringBootApplication
@ComponentScan(basePackages = {"com.example"})
public class DemoApplication extends SpringBootServletInitializer{

	public static void main(String[] args) {
		SpringApplication.run(DemoApplication.class, args);
	}

	@Override
	protected SpringApplicationBuilder configure(SpringApplicationBuilder builder) {
		return builder.sources(DemoApplication.class);
	}
}main method가 있는 곳 뿐만아니라 com.example아래에 있는 곳을 스캔할 수 있도록 ComponentScan을 com.example로 바꾸어준다.
DataBaseConfiguration을 연결해주기위한 클래스 생성
@Configuration
@PropertySource("classpath:/application.properties")
@Slf4j
public class DatabaseConfiguration {

	@Autowired
	private ApplicationContext applicationContext;

	@Bean
	@ConfigurationProperties(prefix = "spring.datasource.hikari")
	public HikariConfig hikariConfig() {
		return new HikariConfig();
	}

	@Bean
	public DataSource dataSource() throws Exception{
		DataSource dataSource = new HikariDataSource(hikariConfig());
		return dataSource;
	}
}HikariCP를 연결해주기위한 설정을 한후 junit에서 DataSource가 null인지 테스트를 한다
MemberVO생성
@Data
@NoArgsConstructor
@AllArgsConstructor
public class MemberVO {
	private String userid;
	private String passwd;
	private String name;
	private int age;
	private String gender;
	private String city;
}
MemberDao interface 생성
public interface MemberDao {

	void create(MemberVO member);
	void readAll(Map map);
	void read(Map map);
	void update(MemberVO member);
	void delete(String userid);
}파라미터가 많을수록 map을 사용하는 것이 좋다. 하지만 이번에는 쉽게 select할 경우에만 map을 사용할 것이다.
리턴타입은 모두 Map안에서 해결할 수 있기때문에 리턴타입은 모두 void이다
maybatis-mapper.xml 생성
<?xml version="1.0" encoding="UTF-8" ?>
<!DOCTYPE mapper
  PUBLIC "-//mybatis.org//DTD Mapper 3.0//EN"
  "http://mybatis.org/dtd/mybatis-3-mapper.dtd">
<mapper namespace="Member">

<resultMap type="memberVO" id="memberResultMap">
	<id property="userid" javaType="string" column="userid" jdbcType="VARCHAR"/>
	<result property="passwd" javaType="string" column="passwd" jdbcType="VARCHAR"/>
	<result property="name" javaType="string" column="name" jdbcType="VARCHAR"/>
	<result property="age" javaType="int" column="age" jdbcType="INTEGER"/>
	<result property="gender" javaType="string" column="gender" jdbcType="VARCHAR"/>
	<result property="city" javaType="string" column="city" jdbcType="VARCHAR"/>
</resultMap>

<parameterMap type="string" id="oneMemberParameterMap">
	<parameter property="userid" javaType="string" jdbcType="VARCHAR" mode="IN"/>
</parameterMap>

<select id="selectAll" statementType="CALLABLE" resultMap="memberResultMap" resultType="memberVO">
	{ call sp_member_select_all() }
</select>

 <select id="selectOne" statementType="CALLABLE" resultMap="memberResultMap"
 parameterType="string" parameterMap="oneMemberParameterMap">
 	{ call sp_member_select(?) }
 </select>

<parameterMap type="memberVO" id="insertMemberParameterMap">
	<parameter property="userid" javaType="string" jdbcType="VARCHAR" mode="IN"/>
	<parameter property="passwd" javaType="string" jdbcType="VARCHAR" mode="IN"/>
	<parameter property="name" javaType="string" jdbcType="VARCHAR" mode="IN"/>
	<parameter property="age" javaType="int" jdbcType="INTEGER" mode="IN"/>
	<parameter property="gender" javaType="string" jdbcType="VARCHAR" mode="IN"/>
	<parameter property="city" javaType="string" jdbcType="VARCHAR" mode="IN"/>
</parameterMap>

<insert id="insert" statementType="CALLABLE" parameterMap="memberVO" >
	{ call sp_member_insert(?,?,?,?,?,?) }
</insert>

</mapper>id는 기본키를 명시해준것임으로 result를 사용하여도 상관없다
스토드프로지저를 사용할 것이기 때문에 statementType은 CALLABEL을 사용하였고
MemberDao interface를 상속받는 MemberDaoImpl클래스 생성
@Repository("memberDao")
public class MemberDaoImpe implements MemberDao {

	@Autowired
	private SqlSession sqlSession;

	@Override
	public void create(MemberVO member) {
		this.sqlSession.insert("Member.insert", member);
	}

	@Override
	public void readAll(Map map) {
		System.out.println("ddd");
		List<MemberVO> list = this.sqlSession.selectList("selectAll");
		map.put("results", list);
	}

	@Override
	public void read(Map map) {
		MemberVO member = this.sqlSession.selectOne("Member.selectOne",  (String)map.get("userid"));
		map.put("result", member);
	}

	@Override
	public void update(MemberVO member) {

	}

	@Override
	public void delete(String userid) {
		this.sqlSession.delete("Member.delete", userid);
	}

}
MemberService interface생성
public interface MemberService {
	void insertMember(MemberVO member);
	void selectAllMembers(Map map);
	void selectMember(Map map);
	void updateMember(MemberVO member);
	void deleteMember(String userid);
}MemberService interface를 상속받는 MemberService Impl생성
package com.example.service;

import java.util.Map;

import org.springframework.beans.factory.annotation.Autowired;
import org.springframework.stereotype.Service;

import com.example.dao.MemberDao;
import com.example.vo.MemberVO;

@Service("memberService")
public class MemberServiceImpl implements MemberService {

	@Autowired
	private MemberDao memberDao;

	@Override
	public void insertMember(MemberVO member) {
		// TODO Auto-generated method stub

	}

	@Override
	public void selectAllMembers(Map map) {
	this.memberDao.readAll(map);
	}

	@Override
	public void selectMember(Map map) {
	this.memberDao.read(map);
	}

	@Override
	public void updateMember(MemberVO member) {
		this.memberDao.create(member);
	}

	@Override
	public void deleteMember(String userid) {
		this.memberDao.delete(userid);
	}

}
MemberController생성
RestController를 이용하기
@RestController
@Slf4j
public class MemberController {
	@Autowired
	private MemberService memberService;


	@GetMapping("/members")
	public Map list(Model model) {
	Map<String, Object> map = new HashMap<String, Object>();
	this.memberService.selectAllMembers(map);
	List<MemberVO> list = (List<MemberVO>)map.get("results");
	return map; //templates/list.html
	}

	@GetMapping("/members/{userid}")
	public Map display(@PathVariable String userid) {
		Map<String,Object> map = new HashMap<String,Object>();
		map.put("userid",userid);
		this.memberService.selectMember(map);
		MemberVO member = (MemberVO)map.get("result");
		map.remove("userid");
		return map;
	}
	@PostMapping("/members")
	public Map insert(@RequestBody MemberVO member) {
		Map map = new HashMap<String, Object>();
		this.memberService.insertMember(member);
		map.put("code", "success");
		return map;
	}

	@DeleteMapping("/members/{userid}")
	public Map delete(@PathVariable String userid) {
		Map map = new HashMap<String, Object>();
		this.memberService.deleteMember(userid);
		return map;
	}
}리턴은 map으로 하면 알아서 json화 하여 데이터를 보내준다.
Spring legacy였다면 젝슨 바인드라는 모듈이 필요하지만 이미 내장이 되어 있기 때문에 따로 사용하지 않아도 된다
model이 필요없는 이유는 전부 json을 이용하여 보내줄 것이기 때문이며
json형태로 보내줄것이기 때문에 리턴타입은 반드시 Map으로 지정한다.
| 설명 | |
| @PathVariable | {userid}에 따라 원하는 값을 받고싶을 때 사용하는 어노테이션 |
Mapper-configClass생성
resultMap에서 길게 com.example.vo라고 쓰지않고 memberVO라고 별칭으로 사용할 수 있게 alias를 설정해준다.
War사용하기
<packaging>war</packaging>version과 name사이에 적어준다
Tomcat라이브러리 가져오기
<dependency>
    <groupId>org.springframework.boot</groupId>
    <artifactId>spring-boot-starter-tomcat</artifactId>
    <version>2.6.1</version>
</dependency>
main method가 있는 곳으로 가기
@SpringBootApplication
@ComponentScan(basePackages = {"com.example"})
public class DemoApplication extends SpringBootServletInitializer {

	public static void main(String[] args) {
		SpringApplication.run(DemoApplication.class, args);
	}

	@Override
	protected SpringApplicationBuilder createSpringApplicationBuilder() {
		return new SpringApplicationBuilder(DemoApplication.class);
	}
}전부 다 한후에 maven istall을 한다.
servers에 들어가 진짜 톰켓을 붙여준다(ver9)
tomcat을 더블 클릭 후 path를 /(root)로 바뀌준다.
lo4jdbc때문에 tomcat이 안되기때문에 application에서 지우자.
포트번호를 8080이 아닌 80으로 바뀌준 후 tomcat실행해보기
index.html만들기
<!DOCTYPE html>
<html lang="en">

<head>
    <meta charset="UTF-8">
    <meta http-equiv="X-UA-Compatible" content="IE=edge">
    <meta name="viewport" content="width=device-width, initial-scale=1.0">
    <title>Welcome to www.example.com</title>
    <link rel="stylesheet" href="/css/bootstrap.min.css">
    <script src="/js/jquery-3.6.0.min.js"></script>
    <script>
    $(function () {
            $("#btnList").on("click",function(){
                location.href="list.html";
            });
            $("#btnRegister").on("click",function(){
                location.href="register.html";
            });
        });
    </script>
</head>

<body>
    <div class="container">
        <div class="row">
            <img src="/images/springboot.jpg">
            <div class="juumbotron">
                <div class="row">
                    <h1 class="test-center">www.example.com</h1>
                    <div>Lorem ipsum dolor sit amet consectetur adipisicing elit. Vel quod adipisci error? Sed earum repellat ratione, fugiat accusamus assumenda expedita incidunt voluptates aliquid delectus culpa obcaecati ducimus cupiditate quos. Quia.</div>
                    <button class="btn btn-primary btn-lg" id ="btnList">전체회원명단</button>
                    <button class="btn btn-primary btn-lg" id="btnRegister">회원가입</button>
                </div>
            </div>
        </div>

    </div>


</body>

</html>jquery나 bootstrap이 잘 돌아가나 확인하기 위해 만든 것이며 시작시에 바로 static밑에 있는 index.html을 찾기때문에 만들것이다.
container class는 부트스트랩을 이용한 것이며 row를 하나하나 가져다 놓는 역할을 한다.
링크를 통해 jquey와 css를 사용할 수 있게 만들었다.
버튼 클릭이벤트가 발생기 list.html로 가게 만들었다.
list.html
<!DOCTYPE html>
<html lang="en">

<head>
    <meta charset="UTF-8">
    <meta http-equiv="X-UA-Compatible" content="IE=edge">
    <meta name="viewport" content="width=device-width, initial-scale=1.0">
    <title>전체회원명단보기</title>
    <link rel="stylesheet" href="/css/bootstrap.min.css">
    <script src="/js/jquery-3.6.0.min.js"></script>
    <script>
    $(function () {
            $.ajax({
                url:  '/members',
                type : 'get',
                dataType : 'json',
                success : function(data){
                    const members = data.results;
                    let str= "";
                    for(let i = 0; i< members.length ; i++){
                        let gender = (members[i].gender =='1') ? '남성' : '여성';
                        let userid = members[i].userid;
                        str += "<tr>";
                        str += "<td><a href='display.html?userid=" + userid + "'>" + userid + "</a></td>";
                        str += "<td>" + members[i].name + "</td>";
                        str += "<td>" + members[i].age + "</td>";
                        str += "<td>" + gender + "</td>";
                        str += "<td>" + members[i].city + "</td>";
                        str += "</tr>"
                    }
                    $("#results").html(str);
                },
                error : function(err){
                    alert(err)
                }
            })
        });
    </script>
</head>

<body>
    <div class="container">
        <div class="row">
            <img src="/images/springboot.jpg">
        </div>
        <div class="row">
            <div>
                    <h1 class="text-center">전체회원명단</h1>
            </div>
            <div class="table table-bordered">
               <thead>
                <tr>
                    <td>아이디</td>
                    <td>이름</td>
                    <td>나이</td>
                    <td>성별</td>
                    <td>거주지</td>
                </tr>
            </thead>
            <tbody id="results">

            </tbody>
            </div>
        </div>
    </div>
</body>
</html>ajax를 이용하여 데이터를 가져오며 로딩이 되었을 시 실행되는 jquey문을 만들어 준다.
tbody에 아이디를 설정하여 로딩디 안에 들어갈 내용을 str로 만들어 tbody에 주입해준다.
display.html만들기
<!DOCTYPE html>
<html lang="en">
<head>
<meta charset="UTF-8">
<meta http-equiv="X-UA-Compatible" content="IE=edge">
<meta name="viewport" content="width=device-width, initial-scale=1.0">
<title>전체회원명단보기</title>
<link rel="stylesheet" href="/css/bootstrap.min.css">
<script src="/js/jquery-3.6.0.min.js"></script>
<script>
$(function () {
const userid = location.search.substring(1).split('=')[1];
$.ajax({
url: '/members' + userid,
type : 'GET',
dataType : 'json',
success : function(data){
const members = data.result;
let userinfo= user.name + "(" + user.userid + ")";
$("#userinfo").text(userinfo);
$("#age").text(user.age);
$("#gender").text((user.gender == '1') ? '남성' : '여성');
$("#city").text(user.city);
},
error : function(err){
alert(err)
}
})
});
</script>
</head>
<body>
<div class="container">
<div class="row">
<img src="/images/springboot.jpg">
</div>
<div class="row">
<h1><span id="userinfo"></span>'s 정보</h1>
<ul>
<li>나이 : <span id="age"></span></li>
<li>성별 : <span id="gender"></span></li>
<li>거주지 : <span id="city"></span></li>
</ul>
<div>
<button class="btn btn-primary btn-lg">목록으로</button>
<button class="btn btn-success btn-lg">수정하기</button>
<button class="btn btn-warning btn-lg">삭제하기</button>
</div>
</div>
</div>
</body>
</html>| 설명 | |
| location.search. | url에서 ?다음을 뽑아낸다 |
| substring(1) | ?뒤에 값부터 끝까지 가져온다 |
| split('=')[1] | =을 중심으로 배열을 만들며 그 중 0번째가 아닌 1번째를 가져온다 |
| ex) XXX.html?userid=younghee라면 younghee를 가져온다 | |
줄을 바꾸지 않으면서 비어있는 테그인 span을 h1에 넣어준다.
span에 아이디를 userinfo로 주었고 그 빈 공간에 일단 text를 넣어줄 것이기 때문에 text를 이용한다.
history.go(0)은 현재 위치 그대로 유지하겠다는 의미이다
Register.html
<!DOCTYPE html>
<html lang="en">

<head>
    <meta charset="UTF-8">
    <meta http-equiv="X-UA-Compatible" content="IE=edge">
    <meta name="viewport" content="width=device-width, initial-scale=1.0">
    <title>전체회원명단보기</title>
    <link rel="stylesheet" href="/css/bootstrap.min.css">
    <script src="/js/jquery-3.6.0.min.js"></script>
    <script>
    $(function () {
           $('button').click(function(){
                $.ajax({
                    url: 'members',
                    type: 'POST',
                    contentType : 'application/json;charset=utf-8',
                    data: JSON.stringify({
                        "userid" : $('#userid').val(),
                        "passwd" : $('#passwd').val(),
                        "name" : $('#name').val(),
                        "gender" : $('#gender').val(),
                        "age" : $('#age').val(),
                        "city" : $('#city').val(),
                    }),
                    datatype= 'json',
                    success : function(data){
                        location.href='list.html';
                    }
                })
           })
        });
    </script>
</head>

<body>
    <form class="form-horizontal">
      <div class="form-group">
        <label for="txtUserid" class="col-sm-3 control-label">아이디</label>
        <div class="col-sm-5">
          <input type="text" class="form-control" id="txtuserid" placeholder="Enter yout UserId" name="userid">
        </div>
      </div>
      <div class="form-group">
        <label for="txtPasswd" class="col-sm-3 control-label">비밀번호</label>
        <div class="col-sm-5">
          <input type="password" class="form-control" id="txtPasswd" placeholder="Password" name="passwd">
        </div>
      </div>
      <div class="form-group">
        <label for="txtName" class="col-sm-3 control-label">이름</label>
        <div class="col-sm-5">
          <input type="text" class="form-control" id="txtName" placeholder="Enter your Name" name="name">
        </div>
      </div>
      <div class="form-group">
           <label for="txtAge" class="col-sm-3 control-label">나이</label>
        <div class="col-sm-offset-3">
          <input type="number" class="form-control" id="txtAge" placeholder="Enter your Age"  min="20" max="60" name="gender">
        </div>
      </div>

      <div class="form-group">
      <label for="txtAge" class="col-sm-3 control-label">성별</label>
        <div class="col-sm-5">
            <label class="radio-inline">
                <input type="radio" name="gender" class="gender" value="1">남성
            </label>
            <label class="radio-inline">
                <input type="radio" name="gender" class="gender" value="0">여성
            </label>
        </div>
      </div>
      <div class="form-group">
           <label for="txtAge" class="col-sm-3 control-label">거주지</label>
        <div class="col-sm-5">
        <select id="city" name="city" class="form-control">
              <option>--거주지 선택</option>
              <option value="서울">서울</option>
            <option value="부산">부산</option>
            <option value="대구">대구</option>
             <option value="대전">대전</option>
             <option value="인천">인천</option>
             <option value="광주">광주</option>
        </select>
        </div>
      </div>
      <div class="form-group">
        <div class="col-sm-offset-2 col-sm-10">
            <button type="button" class="btn btn-primary">회원가입</button>
        </div>
      </div>
    </form>
    </body>
</html>자바스크립트 객체를 문자열로 변환하여 보내줘야하기때문에 jsonStringify를 사용한다.
'SpringBoot 코딩' 카테고리의 다른 글
| 10. DB와 연동한 Security, Password Encording (SpringSecurity) (0) | 2021.12.11 |
|---|---|
| 9. Spring SeCurity (SpringBootSecurityDemo) (0) | 2021.12.11 |
| 7.2 Mybatis와 hikariCP를 이용한 프로젝트 만들기(BootJdbcDemo) (0) | 2021.11.26 |
| 6. Database(NCloud)를 이용한 SpringBoot (BootJdbcDemo) (0) | 2021.11.24 |
| 5. Thymeleaf사용하기 (templatedemo) (0) | 2021.11.24 |