

BE전문가 프로젝트
6. AWS 관리형 서비스로 Serverless 아키텍처 구현 본문
- 파일을 S3에 업로드할 때 Lambda 함수를 트리거하는 실습을 할 예정이다.
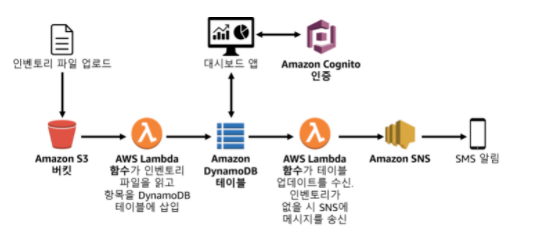
- 재고 파일을 S3 버킷에 업로드한다.
- Serverless 웹 기반 dashboard 애플리케이션이 Cognito를 사용하여 AWS에서 인증한 DynamoDB테이블에 대한 액세스 권한을 얻어 재고 수준을 표시한다.
- Lambda함수가 DynamoDB테이블에서 업데이트를 수신하고 재고폼이 떨어지면 SNS(Simple Notification Service) 주체에 메시지를 보낸다.
- SNS가 사용자에게 SMS 또는 E-mail 알림을 보내 추가 재고를 요청한다.
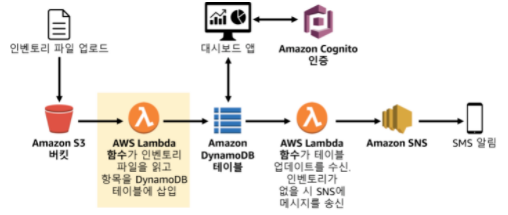
Lambda 함수를 생성하여 데이터로드
- Lambda 함수를 생성하여 재고 파일을 처리한다. Lambda 함수는 다이어그램에 표시된거처럼 파일을 읽고 DynamoDB테이블에 정보를 삽입한다.
1. Service메뉴에서 Lambda를 클릭 후 Create funtion을 클릭한다.
2. 다음을 구성한 후 Create function을 클릭한다.
- Author from scratch를 선택한다.
- Function name : Load-Inventory
- Runtime : python 3.8
Change default execution role을 확장한다.
- Execution role : Use an existing role
- Existing role : Lambda-Load-inventory-Role
(Lambda함수에 실행권한을 부여하므로 Lambda 함수가 S3및 DynamoDB에 액세스할 수 있다.)
3. Create function을 클릭한다.
4. Code source 섹션까지 스크롤을 내린다음 코드 편집기에서 lambda_function.py를 더블클릭해서 열고 다음 코드를 넣는다.
# Load-Inventory Lambda function
#
# This function is triggered by an object being created in an Amazon S3 bucket.
# The file is downloaded and each line is inserted into a DynamoDB table.

import json, urllib, boto3, csv

# Connect to S3 and DynamoDB
s3 = boto3.resource('s3')
dynamodb = boto3.resource('dynamodb')

# Connect to the DynamoDB tables
inventoryTable = dynamodb.Table('Inventory');

# This handler is executed every time the Lambda function is triggered
def lambda_handler(event, context):

  # Show the incoming event in the debug log
  print("Event received by Lambda function: " + json.dumps(event, indent=2))

  # Get the bucket and object key from the event
  bucket = event['Records'][0]['s3']['bucket']['name']
  key = urllib.parse.unquote_plus(event['Records'][0]['s3']['object']['key'])
  localFilename = '/tmp/inventory.txt'

  # Download the file from S3 to the local filesystem
  try:
    s3.meta.client.download_file(bucket, key, localFilename)
  except Exception as e:
    print(e)
    print('Error getting object {} from bucket {}. Make sure they exist and your bucket is in the same region as this function.'.format(key, bucket))
    raise e

  # Read the Inventory CSV file
  with open(localFilename) as csvfile:
    reader = csv.DictReader(csvfile, delimiter=',')

    # Read each row in the file
    rowCount = 0
    for row in reader:
      rowCount += 1

      # Show the row in the debug log
      print(row['store'], row['item'], row['count'])

      try:
        # Insert Store, Item, and Count into the Inventory table
        inventoryTable.put_item(
          Item={
            'Store':  row['store'],
            'Item':   row['item'],
            'Count':  int(row['count'])})

      except Exception as e:
         print(e)
         print("Unable to insert data into DynamoDB table".format(e))

    # Finished!
    return "%d counts inserted" % rowCount
- S3에 업로드되어 함수를 트리거한 파일을 다운로드한다.
- 파일의 각 줄을 루프처리한다.
- 데이터를 DynamoDB Inventory 테이블에 삽입한다.
5. 페이지 상단에서 Deploy를 클릭한다.
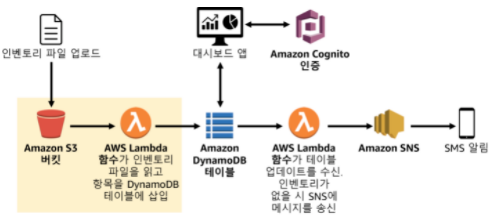
S3 이벤트 구성
- 재고 추적 시스템에 로드할 제고 파일을 제공한다. 매장은 FTP를 통하지 않고 S3에 집접 파일을 업로드할 수 있다.
파일이 수신되면 Lambda함수가 트리거되어 DynamoDB 테이블에 재고 파일을 자동으로 로드한다.
1. S3를 클릭하고 Create bucket을 클릭한다.
2. Bucket name에 inventory-0811을 넣는다 (고유의 이름)
3. 아래 Create Bucket을 클릭한다.
4. 이제 파일이 업로드 될 때마다 자동으로 Lambd함수를 트리거하도록 Bucket을 구성한다.
5. 방금 생성한 Bucket을 클릭한 후 properties탭을 클릭한다.
6. 아래로 스크롤하여 Event notification 세션으로 이동한 다음 Create event notification버튼을 클릭한다.
7. General configuration 항목 아래에 다음과 같이 구성한다.
- Event name : Load-Inventory
8. Event type 항목 아래에 다음을 선택한다.
- All object Create events 체크박스에 체크한다.
9. Destincation항목아래 Lambda function이 선택 되어있는지 확인한다.
- Choose from your Lambda functions가 선택되어있어야한다.
- Lambda function선택상자 : Load-Inventory를 선택한다.
10. 화면아래 Save Changes 버튼을 클릭한다.
11. 이렇게하면 버킷에서 객체가 생성될 때마다 앞서 만든 Load-Inventory Lambda 함수를 트리거하라고 S3에 알린다.
12. 버킷이 재고파일을 수신할 준비는 끝이 났다.
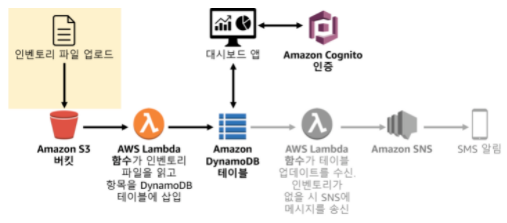
로딩 프로세스 테스트
- 재고 파일을 업로드한 다름 성공적으로 로드되었는지 확인한다.
1. inventory-file.zip을 다운 받고 압출을 푼다.
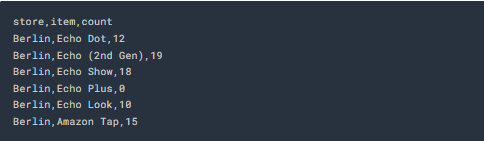
- 여러 재고 csv파일이 있고 그 중 예를 들어 Berlin파일에은 다음 데이터가 포함된다.
1. 생성된 Bucket을 클릭 후 object 탭 아래 upload 버튼을 클릭한다.
2. add file 버튼을 클릭 후 CSV파일 아무거나 업로드한 후 Upload버튼을 클릭한 다음 close를 누른다.
3. 읽고있는 문서의 Dash board URL을 복사 후 브라우저로 연다.
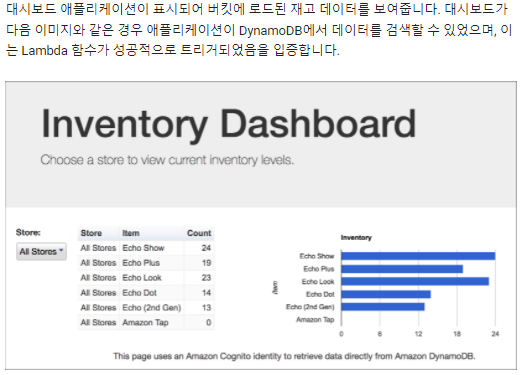
4. Service메뉴에서 Dynamo DB를 클릭 후 왼쪽 탐색 창에서 Table을 클릭한다.
5. Inventory 테이블의 이름을 클릭한다. Items 탭을 클릭 후 재고파일을 확인한다.
알림구성
- 웹 애플리케이션을 통해 재고 파일을 빠르게 볼 수 있으므로 매장에 품목이 부족할 때 재고 관리 담당자에게 알릴 수 있다.
- 다이어그램과 같이 Amazon Simple Notification Service(SNS)를 사용한다.
1. services에서 Simple Notification Service를 클릭한다.
2. 왼쪽 패널을 클릭 후 Topic을 클릭한 후 Create Tipic을 클릭한다.
3. Standard옵션을 선택한다.
4. Create topictk상자의 Name을 넣고 싶은 고유한 주체 이름을 입력한다.
5. 다음 작업을 위해서 이 주체의 이름을 기억한다.
6. Create topic을 클릭한다.
- 알림을 수신하려면 주체를 구독해야한다. 한국에서는 Email만 가능하다.
7. Create subscription을 누른다.
- Protocl : Email을 선택한다.
- Endpoint에 나의 이메일을 적는다.
- Create subscription을 클릭한다.
알림을 전송하는 Lambda함수 생성
- 기존의 Load-Inventory Lambda 함수를 수정하여 파일이 로드되는 동안 재고 수준을 확인할 수 있지만, 이는 아키텍처의 모범사례가 아니다. Load-Inventory함수를 비즈니스 로직으로 과부화 시키는 대신, DynamoDB테이블에 데이터가 로드될 때마다 트리거되는 다른 Lambad함수를 생성한다.
1. Services 메뉴에서 Lambda를 클릭 후 Create function을 클릭 후 다음을 구성한다.
- Author from scratch를 선택한다.
- Name : Check-Stock
- Runtime : python 3.8
- Change default execution role을 확장한다.
- execution role : Use an existing role
- Existing role : Lambda-Check-Stock-Role
- Create function을 클릭한다.
2. Code source섹션까지 스크롤을 내린 다음, 코드 편집기에서 lambda_function.py를 더블 클릭해서 열고 표시되는 모든 코드를 삭제한다음 다음 코드를 붙여넣는다.
# Stock Check Lambda function
#
# This function is triggered when values are inserted into the Inventory DynamoDB table.
# Inventory counts are checked, and if an item is out of stock, a notification is sent to an SNS topic.

import json, boto3

# This handler is executed every time the Lambda function is triggered
def lambda_handler(event, context):

  # Show the incoming event in the debug log
  print("Event received by Lambda function: " + json.dumps(event, indent=2))

  # For each inventory item added, check if the count is zero
  for record in event['Records']:
    newImage = record['dynamodb'].get('NewImage', None)
    if newImage:

      count = int(record['dynamodb']['NewImage']['Count']['N'])

      if count == 0:
        store = record['dynamodb']['NewImage']['Store']['S']
        item  = record['dynamodb']['NewImage']['Item']['S']

        # Construct message to be sent
        message = store + ' is out of stock of ' + item
        print(message)

        # Connect to SNS
        sns = boto3.client('sns')
        alertTopic = 'wonho'
        snsTopicArn = [t['TopicArn'] for t in sns.list_topics()['Topics']
                        if t['TopicArn'].lower().endswith(':' + alertTopic.lower())][0]

        # Send message to SNS
        sns.publish(
          TopicArn=snsTopicArn,
          Message=message,
          Subject='Inventory Alert!',
          MessageStructure='raw'
        )

  # Finished!
  return 'Successfully processed {} records.'.format(len(event['Records']))
- 수신 레코드를 루프처리한다.
- 재고 수량이 0인경우 SNS 주체에 메시지를 전송한다.
3. 코드 31번 라인의 alertTopic 변수의 값을 내가 지정한 고유의 값(wonho)으로 변경한다.
4. 페이지 상단의 function overview 섹션으로 스크롤을 이동한다.
5. Add trigger을 클릭하고 다음을 구성한다.
- Select a trigger : DynamoDB
- DynamoDB Table : Inventory
- Add를 클릭한다.
시스템 테스트
- S3에 재고를 업로드한다. 그러면 Load-Inventory함수가 트리거가 된다. 이 함수는 DynamoDB에 데이터를 로드하면 새 Check-Stock Lambda 함수가 트리거가 된다. 이 Lambda함수는 재고가 0인 품목을 감지하면 SMS 또는 이메일을 통해 SNS에 메시지를 전송한다.
1. S3를 클릭한 다음 이름이 Inventory-xxx인 버킷을 클릭한다.
2. 다른 재고 파일을 업로드한다음 Inventory 웹 브라우저 탭으로 돌아가서 페이지를 새로 고친다.
'AWS 실습' 카테고리의 다른 글
| 5. AWS CloudFormation을 사용한 인프라 배포 자동화 (0) | 2021.12.16 |
|---|---|
| 4. 고가용성 환경 생성 (0) | 2021.12.16 |
| 3. 가상 사설 클라우드 생성(VPC), Peering Connection (0) | 2021.12.15 |
| 2. AWS에서 웹 애플리케이션 배포 (0) | 2021.12.15 |
| 1. AmazonS3 버킷 생성 (0) | 2021.12.14 |

