

BE전문가 프로젝트
3. xml과 Annotaion을 이용하여 객체를 설정하는 방법(DI Demo, DIDemo2) 본문
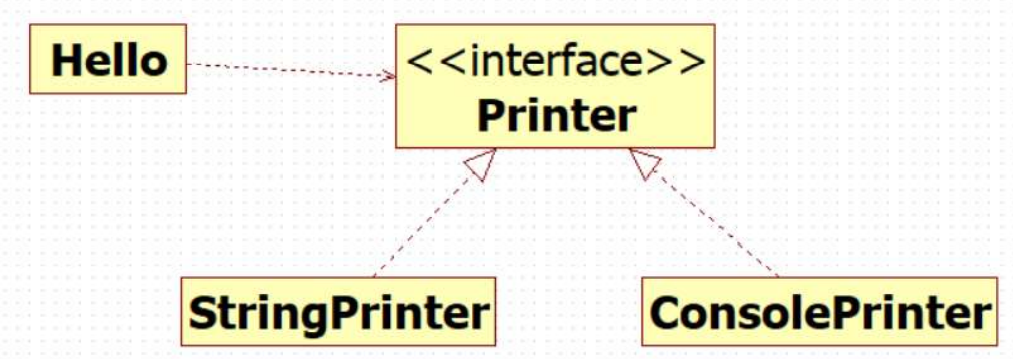
Printer Interface생성
package com.example;

public interface Printer {
	void print(String message);
}
void print라는 추상메소드를 생성한다. lombok에서 제공하는 Annotaion을 활용하여 setter메소드와 기본생성자를 만들거주는 @NoArgsConstructor를 이용한다.
XML을 이용하여 설정하는 방법
Hello Class생성
@Setter
@NoArgsConstructor
public class Hello {
	private String name;
	private Printer printer;

	public String sayHello() {
		return "Hello " + name;
	}

	public void print() {
		this.printer.print(sayHello());
	}

}
Printer interface에 정의되어있는 추상메소드를 이용하여 적용
Printer를 참조하는 StringPrinter 클래스 생성
package com.example;

public class StringPrinter implements Printer {
	private StringBuffer buffer = new StringBuffer();

	@Override
	public void print(String message) {
		this.buffer.append(message);
	}

	public String toString() {
		return this.buffer.toString();
	}
}
문자열을 재정의해주는 StringBuffer를 이용한다.
Printer를 참조하는 ConsolePrinter생성
package com.example;

public class ConsolePrinter implements Printer{

	@Override
	public void print(String message) {

		System.out.println(message);
	}


}
출력이 가능한 클래스를 만든다.
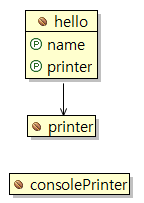
메타설정정보를 가지고 있는 beans.xml 생성
<bean id="hello" class="com.example.Hello">
		<property name="name" value="Spring" />
		<property name="printer" ref="printer" />
	</bean>
	<bean id="printer" class="com.example.StringPrinter" />
	<bean id="consolePrinter" class="com.example.ConsolePrinter" />
각각의 bean에 아이디를 설정하고 생성자가 아닌 setter를 이용하기 때문에 property를 이용한다. printer라는 이름을 가진 property는 printer라는 bean을 참조하기때문에 ref로 printer라는 아이디를 가진 빈을 가르킨다.
실행
1. 실행하기 위한 main 클래스 생성
public class MainClass {
	public static void main(String[] args) {
		ApplicationContext ctx = new GenericXmlApplicationContext("classpath:beans.xml");
		Hello hello = ctx.getBean("hello", Hello.class);
		System.out.println(hello.sayHello());
	}
}
GenericXmlApplicationContext의 상위 인터페이스인 ApplicationContext로 ctx변수를 만들어 Beanfactory가 가지고 있는 getBean이라는 메소드를 사용하여 hello라는 아이디를 가진 bean을 가져온 후 출력한다.
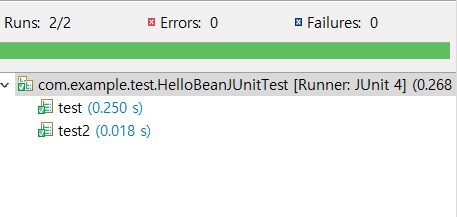
2. JUnit을 이용하여 test하는 방법
public class HelloBeanJUnitTest {
	private ApplicationContext ctx;

	@Before
	public void init() {
		this.ctx = new GenericXmlApplicationContext("classpath:beans.xml");
	}

	@Ignore @Test
	public void test() {
		assertNotNull(this.ctx);
	}
	@Ignore @Test
	public void test2() {
		Hello hello = this.ctx.getBean("hello", Hello.class);
		assertEquals("Hello Spring", hello.sayHello());
	}
    @Test
	public void test3(){
	Hello hello = (Hello)ctx.getBean("hello");

	Hello hello2 = ctx.getBean("hello", Hello.class);
	assertSame(hello, hello2);
	}
}
pom.xml에 JUnit라이브러리를 입력 후 maven install를 하여 JUnit Annotaion 실행이 가능하게 해준다.
@Before는 test를 실행하기전 ctx파일에 classpath를 입력하기위한 Annotaion이며 실질적 text는 @Test에서 이루어진다.@ignore은 테스트를 사용하지 않을 때 사용하는 Annotaion이다.
getBean은 object형이기 때문에 강제형변환을 하는 방법이 있고, 뒤에 클래스명을 입력하는 방법이 있는데 이것은 api에서 확인이 가능하다.
3. SpringFramewor으로 test하는 방법
@RunWith(SpringJUnit4ClassRunner.class)
@ContextConfiguration(locations = {"classpath:beans.xml"})
public class HelloBeanJunitSpringTest {
	@Autowired
	ApplicationContext context;

	@Test
	public void test1() {
		Hello hello = (Hello) context.getBean("hello");
		assertEquals("Hello Spring", hello.sayHello());
		hello.print();
	}
}
먼저 pom.xml에 Springframework를 추가 후 사용이 가능하다.
@Rinwith은 JUnit과 연동하겠다는 junit소속 Annotaion이며 SpringJUnit4ClassRunner.class를 지정해주면 JUnit이 test를 진행하는 동안 AppicationContext를 만들고 관리하는 작업을 진행해 준다.(Junit4에서만 가능하며 Jupiter에서는 다른 Annotaion사용)
JUnit과는 다르게 @Autowired를 통해 @Before에서 직접 바인딩을 하는 것이 아닌 자동으로 바인딩이 가능한데 클래스를 실행하는 순간 자동으로 @ContextConfiguration에서 지정한 환경설정과 자동으로 바인딩이 될 수 있게 해주는 Annotation이다.
Annotaion을 이용하여 설정하는 방법
xml이 아닌 일반 클래스를 생성한다
@Configuration
public class AppCtx {

	@Bean
	public Hello hello() {
		Hello hello = new Hello();
		hello.setName("Spring");
		hello.setPrinter(this.printer());
		return hello;
	}

	@Bean
	public StringPrinter printer() {
		return new StringPrinter();
	}

	@Bean
	public ConsolePrinter consolePrinter() {
		return new ConsolePrinter();
	}
}
일반 자바 클래스가 아니라 환경설정을 위한 클래스이기때문에 @Configuration을 반드시 사용하며 @Bean을 사용하여 bean 객체를 생성한다. xml에서 사용한 id설정은 메소드이름{hello()}이며 클래스명은 리턴타입(Hello)으로 지정한다.
3. SpringFramewor으로 test
@RunWith(SpringJUnit4ClassRunner.class)
@ContextConfiguration(classes = AppCtx.class)
public class HelloBeanTest {
	@Autowired
	private ApplicationContext ctx;

	@Test
	public void test1() {
		Hello hello = this.ctx.getBean("hello", Hello.class);
		assertNotEquals("HelloSpring", hello.sayHello());
	}
}'Spring 코딩' 카테고리의 다른 글
| 5. xml과 Annotation을 동시에 이용하여 설정하기(StringDemo4) (0) | 2021.11.22 |
|---|---|
| 4. Setter와 생성자 이용하여 설정하기(Spring Demo2) (0) | 2021.11.21 |
| 2. Spring 기본 문법(StartSpring) (0) | 2021.11.10 |
| 1. Spring 기본 문법(xml을 이용하여 main에 출력(HelloWorld)) (0) | 2021.11.09 |